This post is for you if you’re just getting started with your drone and are wondering why your shots don’t exactly match those you see in movies.
We’ll go through several options for aerial filmography that you have as well. Your following drone video should appear to be a high-end production.
Let’s start the celebration now!
Pick the right time of day to shoot.
The sensors on most drone cameras, or the main problem with modern drones, aren’t as good as you’d like them to be.
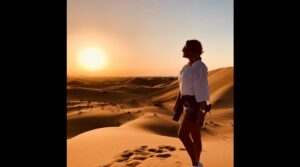
They tend to overexpose as a result, and the dynamic range is somewhat constrained. Therefore, you must pick the ideal time of day to shoot if you want to use drones to record real estate videos that produce the finest results. I refer to either sunrise or sunset when I say it is the right time of day.
During the so-called golden hour, you have a greater chance of getting the greatest lighting and the most beautiful film.
This is because there isn’t much natural light and the sun isn’t very high in the sky. When the sun is almost at the horizon, you will also get those stunning shadows.
This advice is useful when using smaller cameras or even smartphones for the same reason. These cameras’ tiny sensors will overexpose, producing a rainbow of colors.
So, if at all possible, perform your aerial shoots in the early morning. If you tend to sleep in too late, wait until nightfall.
Utilize An ND (Neutral Density) Filter
Another problem with drone filming is the camera’s lightning-fast shutter speed, which produces choppy images.
especially if you’re flying quickly, over water, or the scene includes items that are moving quickly.
If you offer aerial filmography services, you have expert understanding of the subject. When shooting a situation that is especially bright, use a stronger ND filter, like an ND 32 or 64. An ND 4, which is not as dark, can be used when there is little natural light.
If you want to be extremely accurate when choosing the appropriate ND filter rating to employ, check your camera’s overexposure. Depending on how many stops you are overexposed, you can select the proper filter to optically correct your overexposure.
When shooting, choose a flat picture style.
You should configure your camera to record in the least saturated, highest contrast setting possible, is what I’m trying to say. Yes, I am aware that this will make the raw material look to be of lower quality, but it will really provide post-production editors much more area to work with.
By turning up the knobs, you can either increase the saturation and contrast or go for a more subdued appearance by leaving everything more de-saturated. Everything is based on the appearance you want to attain.
In essence, this gives you a variety of alternatives when editing your movie, and you can then make a decision about what to do with it.
Drone footage of real estate that is flown slowly
Although it is really quick and easy to put into practice, many people overlook it. 80% of the drone footage that our clients send us for editing, in my opinion, are lacking simply because the drone was flown too quickly or the movements are too quick.
Smooth, slow motion is what you want. Because you won’t need to slow the video down or utilize stabilization, this will give you that cinematic effect and save you a tonne of time in post-production. Simply put, editing is considerably simpler.
Only while photographing extremely expansive scenes with everything far away can you fly quickly.
Correction And Color Grading
You certainly notice how flat and devoid of color your raw footage appears when you import it into your editor. This is typical, particularly if you acted upon recommendation #3 and took flat pictures.
So don’t worry; we’ll color grade the video in post-production to take care of it. In general, a lot of color modifications are possible using video editing software, so you may do that quickly and easily.
Don’t forget to color correct your drone video to match the appearance and feel of the footage from the other cameras if you’re using it in your project.
Making sure the footage from the two cameras is consistent is important if you’re using a DSLR as the primary camera and adding drone pictures as B-roll.
A quick and simple approach to do this is by using the scopes in your video editing programme. These will clearly demonstrate the differences in your film and the colors you must adjust in order to maintain the visual consistency.
Services for aerial filmmaking
So there you have it, Easy-to-implement suggestions to help you become a better aerial filmmaker. I dare you to fly your drone while utilizing each of these methods, then show us the outcomes. I can’t wait to see your art!